

Hoy en día, consideramos a los alimentos conservados parte esencial de nuestros hábitos alimenticios, pero ¿Qué sabemos sobre su historia? ¿Cómo surgieron?
Las conservas siempre han sido una forma práctica de preservar los alimentos, especialmente en épocas de escasez o en presencia de dificultades para ir a recolectar comida diariamente. El descubrimiento de restos de especies marinas de más de 20.000 años de antigüedad en cuevas lejanas a la costa nos indica que la inquietud por conservar los alimentos se remonta a la Prehistoria. Se conjetura que ya entonces utilizaban técnicas hoy en día vigentes, como el secado al aire libre, el salazón o el ahumado.
Sin embargo, fue el uso de sustancias conservantes (miel, vinagre, grasa, aceite, etc.) el que realmente supuso un claro precedente de los métodos de conservación que utilizamos hoy en día.
Gracias a estos ingredientes aparecieron las primeras conservas (mermeladas, escabeches, encurtidos…) que sin duda supusieron un gran avance, aunque todavía no resultaban suficientemente duraderas y seguras,
además de hacer que aguanten más tiempo, añaden sabor a la dieta y son muy buenos para la salud intestinal.
La evolución de estas técnicas no fue especialmente significativa a lo largo de la historia hasta que, entre el s. XIX y el s. XX, cuatro hombres destacaron en el desarrollo de la conservación alimentaria:

– El confitero y cocinero francés Nicolás Appert (1749-1841), inventó la conserva tal y como la conocemos: con preservación hermética.
Su técnica consistía en calentar los alimentos al baño María dentro de un tarro de cristal, del que extraía el aire para crear el vacío, tras lo cual cerraba herméticamente con un corcho ajustado (inventando así «el tarro de conservas».

– Casi al mismo tiempo, y a partir del método de Appert, fue el comerciante inglés Peter Durand (1766-1822), quien inventó la lata de conservas, el envasado de alimentos sellados al vacío en botes de hierro forjado, el 25 de agosto del año 1810, con la patente número 3372.
Poco después, el norteamericano William Underwood (1787-1864), creó en Nueva Orleans la primera fábrica de alimentos en conserva enlatados. Sin embargo, todavía no se había inventado el abrelatas, cosa que ocurrió medio siglo después, por lo que la lata de conservas presentaba un grave inconveniente, abrirla cómodamente.

-Más tarde, fue Louis Pasteur (1822-1895) quien desarrollaría la pasteurización, método basado en la eliminación de microorganismos que pueden afectar al alimento, a través del calor, una técnica mucho más segura y duradera.
.
.
¿Por qué hacer Conservas Caseras hoy en día?
Según los últimos datos del ministerio de Agricultura, Pesca y Alimentación, el 75,3% de los hogares españoles desperdician alimentos, correspondiendo a un total de 31 kilos por persona y año. Demasiado para los tiempos que corren.
Sabiendo lo difícil que es la organización al detalle; contando en casa con niños, no saber si cenarás en casa o fuera, o con los múltiples imprevistos del día a día, te proponemos hacer algo con esos alimentos que no puedes congelar, pero que no te da tiempo a consumir: que los conviertas en una conserva.
Te contamos cómo hacerlas y cuál es la mejor forma de almacenarlos.
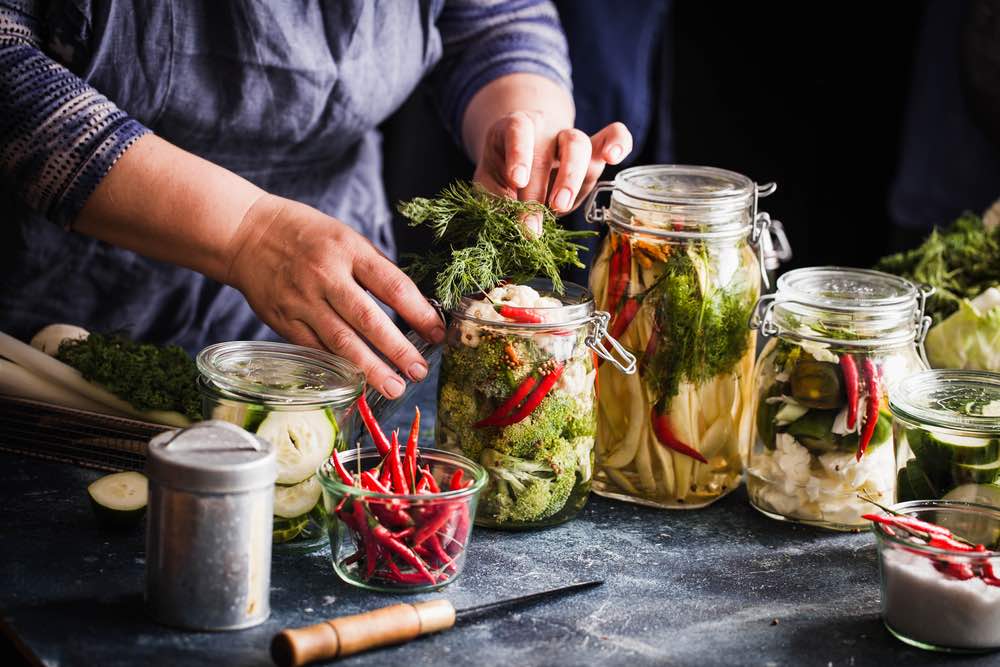
PASO A PASO
Preparar conservas en casa requiere ciertos materiales indispensables si queremos tener resultados óptimos y evitar cualquier contratiempo.
Necesitas una cazuela de acero inoxidable, coladores plásticos , telas de fibra natural, cuchillos (preferiblemente que no sean de metal), pinzas, una espátula de plástico, un embudo, espumaderas (no de metal), cuencos, una balanza, una tabla de picar, tarros y tapas que aguanten altas temperaturas.
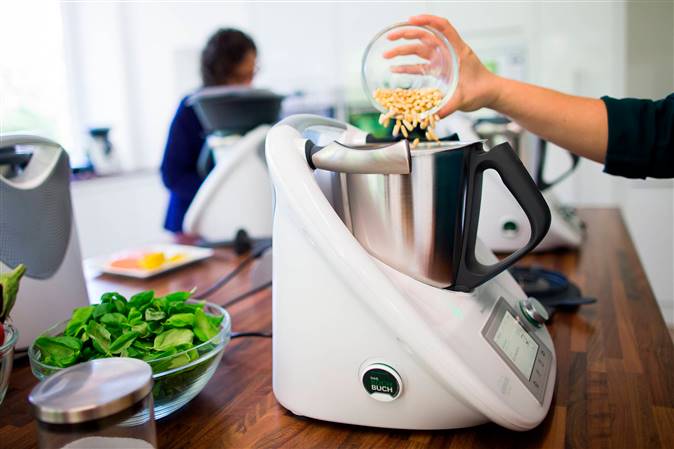
Si tienes un robot de cocina
La tarea es bastante sencilla y no tardarás más de 20 minutos en hacerlas, aunque luego deben reposar, al menos 48 horas, aunque lo ideal es que lo dejes fermentar al menos cinco días más a temperatura ambiente, para no detener el proceso de fermentación al meterlas en la nevera.
Ingredientes:
– 950 gramos de agua.
– 3 hojas de laurel secas.
– 3 ramitas de tomillo fresco.
– 3 ramitas de romero fresco.
– 1 cucharadita colmada de semillas de cilantro.
– 20 gramos de sal.
– 1 cucharadita de granos de pimienta.
– 30 gramos de zumo de limón.
– Verduras que tengas por casa: brócoli, zanahoria, coliflor…
Preparación:
- Pon 700 gramos de agua en el vaso y programa 7 min/100ºC/vel 1
- Añade el laurel, el tomillo, el romero, la semillas de cilantro, la sal y las pimientas. Vierte en una jarra y deja enfriar completamente, unas tres o cuatro horas. Mientras tanto, vamos a esterilizar tres tarros de cristal (que quepan dentro del varoma en posición vertical), hirviéndolos por separado durante 20 o 30 minutos. Déjalos secar sobre un paño limpio.
- Cuando el líquido esté frío u los tarros secos, distribuye en ellos la verdura. cúbrelos con la mezcla, cierra bien los tarros y colócalos en el varoma.
- Pon en el vaso 250 gramos de agua y el zumo de limón. Sitúa el varoma en la posición y programa Fermentar/12horas/70ºC. Pasado este tiempo, retira los tarros del varoma y envuélvelos en una manta o varios paños de cocina para mantener el calor y continuar con la fermentación. Utiliza a conveniencia.
.
.
.
.
.
.
Si no tienes Robot de Cocina
Si no cuentas con un robot de cocina, no te preocupes. El vinagre será nuestro mejor aliado, aunque no quieras hacer un escabeche, poner una pequeña cantidad será imprescindible para hacer tus conservas al natural.
Ingredientes
– 1 kilo de verduras
– Vinagre
– Agua
– Sal
Preparación
1. Esteriliza los tarros siguiendo los pasos anteriores.
2. Elige, lava y corta las verduras que vayas a emplear.
3. Cocínalas en una cazuela con agua hasta cubrirlas y una cucharadita de sal, durante un minuto o medio minuto.
4. Coloca las verduras en un cuenco y agrega el líquido de la cocción. Saca los vegetales de la cazuela con una espumadera y ponlos en el cuenco. Vierte un poco más de 3/4 partes del líquido, rellena el resto con vinagre y agrega una cucharadita de sal. Remueve un poco y deja que se enfríen a temperatura ambiente.
5. Envasa las verduras dentro del tarro con ayuda de unas pinzas y llena de líquido hasta cubrir. Deja solo 1 o 2 centímetros de espacio vacío. Déjalos enfriar y comprueba si están herméticamente cerrados.

Homemade preserves: How to make them step by step.
Today, we consider preserved foods an essential part of our eating habits, but what do we know about their history? How did they come about?
Canning has always been a practical way of preserving food, especially in times of scarcity or when it was difficult to collect food on a daily basis. The discovery of remains of marine species more than 20,000 years old in caves far from the coast indicates that the concern for preserving food dates back to prehistoric times. It is conjectured that techniques such as air-drying, salting and smoking were used even then.
However, it was the use of preservatives (honey, vinegar, fat, oil, etc.) that really set a clear precedent for the preservation methods we use today.
Thanks to these ingredients, the first preserves appeared (jams, pickles, pickles…) which undoubtedly represented a great advance, although they were still not sufficiently durable and safe.
Thanks to these ingredients, the first preserves appeared (jams, pickles, pickles…) which undoubtedly represented a great advance, although they were still not sufficiently durable and safe,
They also make them last longer, add flavour to the diet and are very good for intestinal health.
The evolution of these techniques was not particularly significant throughout history until, between the 19th and 20th centuries, four men stood out in the development of food preservation:
– The French confectioner and cook Nicolas Appert (1749-1841) invented the preserve as we know it: with hermetic preservation.
His technique consisted of heating the food in a bain-marie in a glass jar, from which he extracted the air to create a vacuum, after which he sealed it hermetically with a tightly fitting cork (thus inventing the «preserving jar»).
-Almost at the same time, and based on Appert’s method, it was the English merchant Peter Durand (1766-1822) who invented the tin can, the packaging of vacuum-sealed food in wrought iron jars, on 25 August 1810, with patent number 3372.
-Shortly afterwards, the American William Underwood (1787-1864) set up the first canned food factory in New Orleans. However, the can opener had not yet been invented, which happened half a century later, so the can had a serious disadvantage: it was not easy to open.
-Later, it was Louis Pasteur (1822-1895) who developed pasteurisation, a method based on the elimination of micro-organisms that can affect food, through heat, a much safer and more durable technique.
Why make homemade preserves today?
According to the latest figures from the Ministry of Agriculture, Fisheries and Food, 75.3% of Spanish households waste food, corresponding to a total of 31 kilos per person per year. So much for the times we live in.
Knowing how difficult it is to organise in detail; having children at home, not knowing whether you will be dining at home or out, or with the many unforeseen events of everyday life, we suggest you do something with those foods that you cannot freeze, but that you do not have time to eat: turn them into preserves.
We tell you how to make them and the best way to store them.
STEP BY STEP
Preparing preserves at home requires certain indispensable materials if we want to have optimal results and avoid any mishaps.
You need a stainless steel pan, plastic strainers, natural fibre cloth, knives (preferably not metal), tongs, a plastic spatula, a funnel, skimmers (not metal), bowls, a scale, a chopping board, jars and lids that can withstand high temperatures.
If you have a food processor.
The task is quite simple and it won’t take you more than 20 minutes to make them, although they must then rest for at least 48 hours, although ideally you should leave them to ferment for at least five more days at room temperature, so as not to stop the fermentation process by putting them in the fridge.
Ingredients
– 950 grams of water.
– 3 dried bay leaves.
– 3 sprigs of fresh thyme.
– 3 sprigs of fresh rosemary.
– 1 heaped teaspoon of coriander seeds.
– 20 grams of salt.
– 1 teaspoon peppercorns.
– 30 grams of lemon juice.
– Vegetables you have at home: broccoli, carrots, cauliflower…
Preparation:
1.Put 700 grams of water in the mixing bowl and program 7 min/ 100ºC/ speed 1.
2. Add the bay leaf, thyme, rosemary, coriander seeds, salt and peppers. Pour into a jug and leave to cool completely, about three to four hours. In the meantime, sterilise three glass jars (that fit inside the Varoma upright) by boiling them separately for 20 to 30 minutes. Leave them to dry on a clean cloth.
3. When the liquid has cooled and the jars are dry, place the vegetables in them, cover them with the mixture, close the jars tightly and place them in the Varoma.
4. Place 250 grams of water and the lemon juice in the glass. Place the Varoma in the Varoma and program Ferment/12hours/70ºC. After this time, remove the jars from the Varoma and wrap them in a blanket or several kitchen towels to keep them warm and continue fermenting. Use as desired.
If you don’t have a food processor
If you don’t have a food processor, don’t worry. Vinegar will be our best ally, even if you don’t want to make a marinade, a small amount will be essential to make your preserves naturally.
Ingredients
– 1 kilo of vegetables.
– Vinegar.
– Water.
– Salt
Preparation:
1. Sterilise the jars following the steps above.
2. Choose, wash and cut the vegetables you are going to use.
3. Cook them in a saucepan with water to cover them and a teaspoon of salt for a minute or half a minute.
4. Place the vegetables in a bowl and add the cooking liquid. Remove the vegetables from the pan with a slotted spoon and place them in the bowl. Pour in a little more than 3/4 of the liquid, top up the rest with vinegar and add a teaspoon of salt. Stir a little and leave to cool to room temperature.
5. Pack the vegetables into the jar using tongs and fill with liquid to cover. Leave only 1 or 2 centimetres of empty space. Let them cool and check if they are airtight.